The Grove 0.5
The Grove 5
Wind
Wind animation
There’s nothing like the mesmerizing view of branches dancing in the wind. Wind brings a tree to life, and this makes wind the top requested feature by far. It’s no wonder that I’ve been working on this for quite some time now, trying several completely different approaches to get to this wind system. To do justice to this much wanted feature, it has to satisfy two essentials: speed, and the ability to export animated trees.

Wind shapes
The final wind system uses shape keys, which are fast and compatible with most 3D software. Calculating wind shapes and playing the animation in your viewport are both surprisingly fast, especially when stored in an Alembic file.
To add wind to your tree, select the new build type Adaptive Mesh + Wind.
The tree is animated through a sequence of wind shapes. Wind shapes are built from two components, directional wind and turbulence. Both use the already rock solid bend algorithm, but instead of bending to gravity the tree now bends with the wind – with varying intensity over time.
Secondary motion causes by turbulence is perhaps the most believable. Where the first step is more obvious in strong winds, this step is already present in a slight breeze. It simulates the lift of leaves. By randomizing the leaf weight of each branch over time, the tree starts dancing in the wind.
Duplicating twigs
When building a tree with wind, the tiny polygons that distribute twigs are no longer in a separate object. Together with the branches, they are now one single mesh. Twigs are distributed with particle systems. Vertex groups determine which polygons emit a twig.
The tree is now just one object; easy to handle, manipulate and export.
For added flexibility, The Grove now adds all of the duplicator polygons for lateral twigs. The density slider will change the amount of particles emitted by the system. This way you can tweak the density of the canopy after growing. Keep this in mind when exporting to a different application, and remove some of the triangles if the tree comes in looking too dense.
Also added to the mesh are material groups, which might come in handy when exporting to some file formats. Not all of which support vertex groups or vertex colors. The branches, apical twig and lateral twig duplicators now each have their own material assigned.
Built for alembic
Dr. Sybren Stüvel’s work at the Blender Institute on Alembic export could not be timed any better. The wind animation flows fluently into an Alembic container. Either material groups or vertex colors can be used to duplicate twigs in your target application. Or you can separate the tree geometry by material to get separate twig duplicator objects.
Each application handles the Alembic files differently. Some support the particle system inside, some don’t. Some can handle vertex colors, others don’t. FBX also supports shape keys and it may work better for your target application. It is very important for the Grove to make the trees fit your workflow and we value your input.
Please update to Blender 2.79 to enjoy the improved Alembic export.

Loop
Key frames for each wind shape are 10 frames apart, interpolating smoothly from the previous to the next. The Grove adds additional key frames at the beginning and end to make the animation loop forever. An animation with 10 wind shapes will loop seamlessly every 100 frames.
When exporting to Alembic, be sure to export frame 1 to 100.
Vertex layers
Simulation data
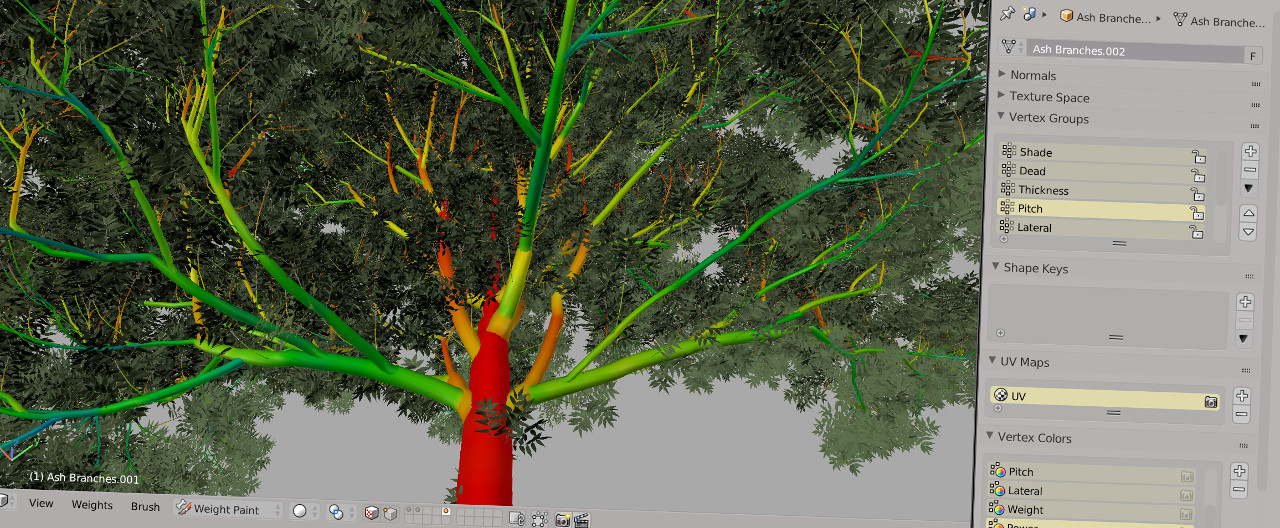
The spreading branches of your tree contain a wealth of information – such as shade, weight, growth power, health and thickness. You can now write layers of simulation data to the tree mesh – opening up new opportunities.
Update – new versions of Blender have replaced vertex colors and groups with the modern attributes. The Grove now directly writes all attributes to every tree mesh you build.
Vertex groups
Vertex groups can be used to enrich modifiers and particle systems. You can use them as selection sets to easily select different parts of your tree, such as dead branches.
This is all very new and it will be interesting to see what you will do with layers. Here are a couple of ideas to get your imagination going…
- Visualize data for insights into the way the tree grows.
- Tweak the branch thicknesses afterwards with a Displace Modifier, using the Thickness vertex group as a mask. Then animate it.
- Use branch pitch and shade to distribute different twigs.
- Use a particle system to distribute lichens on dead branches.
- Further reduce polygons after growing with a Decimate modifier using the Thickness layer as a mask.
Vertex colors
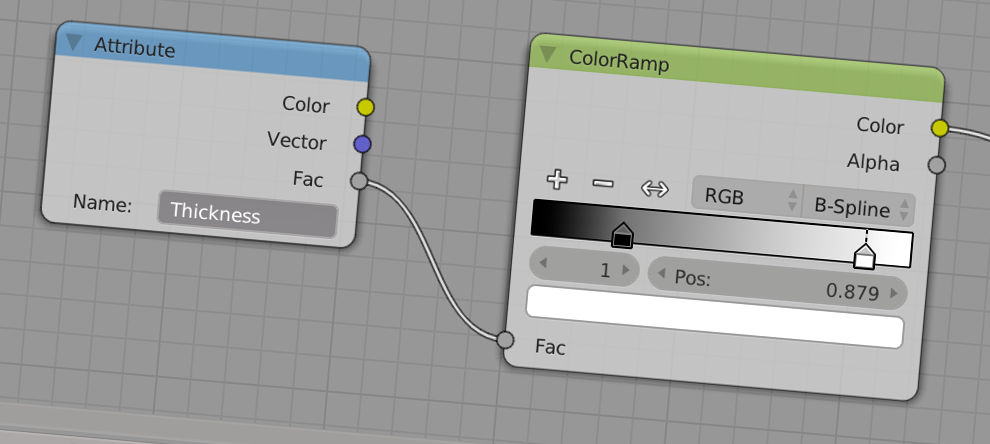
Vertex colors are similar to vertex groups, but can be used for different purposes. You can use color layers in Cycles materials using an attribute node. Feed it the name of the color layer and your materials get a new dimension.
Use vertex color layers in your materials.
Use branch thickness in Cycles to liven up branches. You can use a Color Ramp to add a wet base, green moss and other effects to your trunk and branches.
Color layers can be exported to Alembic, vertex groups can not – something to keep in mind when using The Grove in an animation workflow.
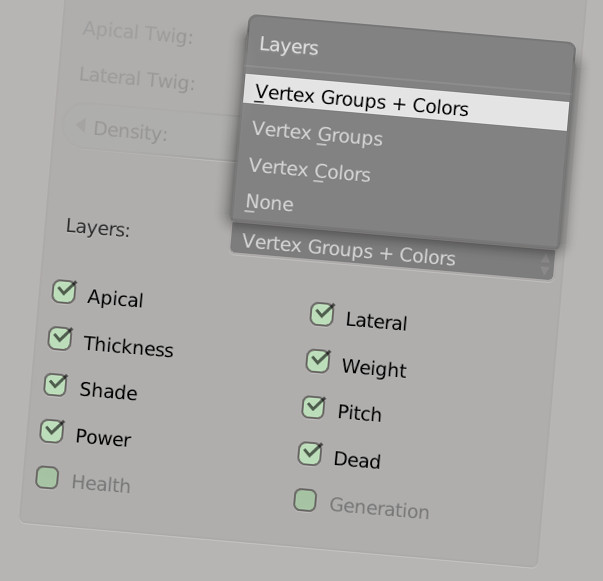
Blender supports up to 8 vertex color layers. If you select more, The Grove will present a warning and it will skip some of the layers.
Simulation improvements
Tip thickness decrease
Release 4 introduced Shade Elongation, allowing shaded branches to grow longer in the hope of finding light faster. Your tree can also choose to shorten shaded branches by using a negative Shade Elongation. But something was missing.
Together with length, you can now also Decrease thickness on weaker branches. It is important to distinguish shaded branches from weak branches. Shaded branches are indeed weaker, but even branches in full sunlight can be squeezed by their parent branch.
It will come as no surprise that bending relies heavily on branch thickness. Low power and decreased thickness can trigger the dangling branches often seen at the bottom of a tree crown.
Tip thickness Decrease enables the character of trees that heavily squeeze their child branches. Some conifers have weeping branches because of this, but only after the first couple of generations have squeezed all available resources to the top of the tree.
Branch bend fatigue
As a branch keeps growing it gains weight and further bends down. Release 4 introduced a physical bend algorithm. But you may have noticed that branches that stopped growing and even dead branches kept on bending. Especially on conifers, this created “melting” branches.
It does hold true for some species where – with age and added weight – the branch tissue gets tired and weakens. Old oak trees often have their lower branches resting on the ground. And I witnessed the melting effect on real conifers. But this does not work for every tree.
Bending is further improved for this release . The Grove now keeps track of the built up tension and allows you to limit bending only to newly gained weight – with the new Fatigue parameter set to 0. Or increase Fatigue to 1 to get the old behavior – branches will eventually collapse under their own weight.
Shade based branch chance
Update – this feature has been superseded by Add > Chance > Reduce. Instead of requiring a certain level of light, which is a harsh cut-off, this new slider gradually reduces the chance of adding a new side branch in places with lower light levels.
There are several ways to get a good distribution of branches. The first is to vigorously grow new branches, let them soak in the light and drop the many that are unsuccessful. Or look for the bright spots in advance and only grow new branches above a brightness threshold. The realistic thing would be a blend of the two. Introducing shade based branch chance, by the name of Light Required.
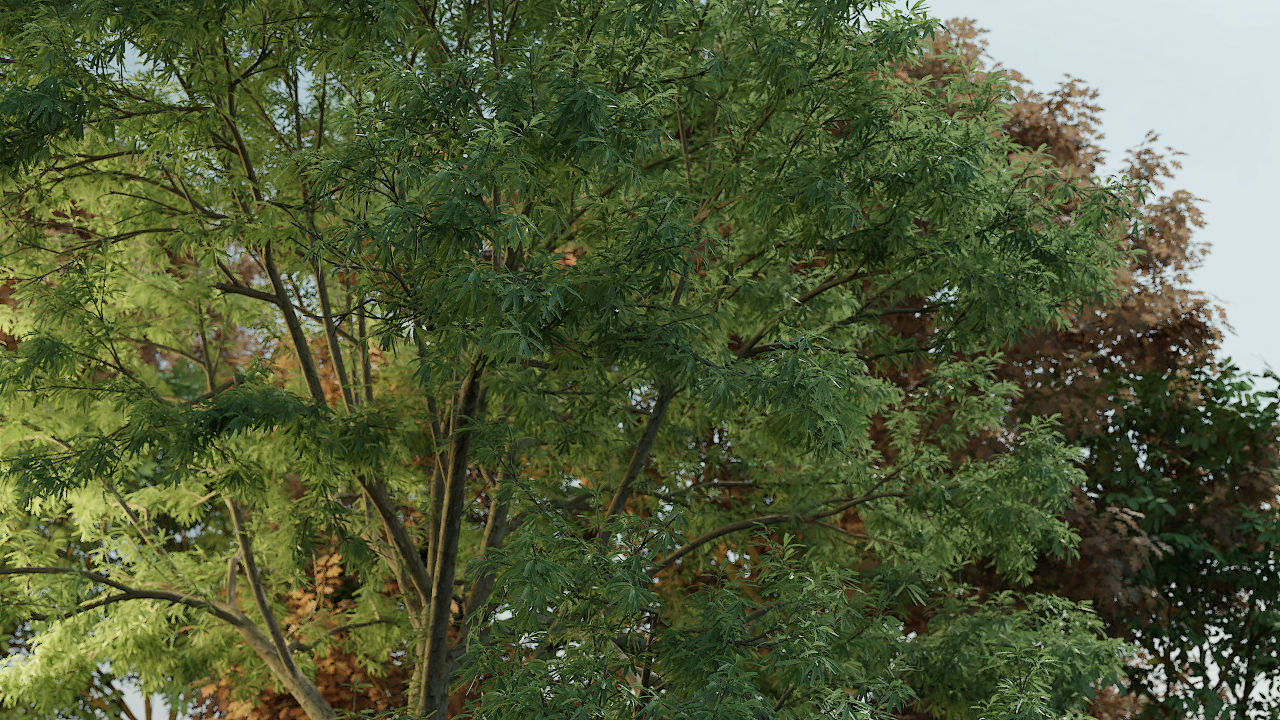
Light Required saves the algorithm from growing thousands of unsuccessful branches. Using it will make growing faster at the expense of less branching in dark areas, don’t overdo it. Using it will not only grow faster, it will also change the character of your tree – as illustrated below.
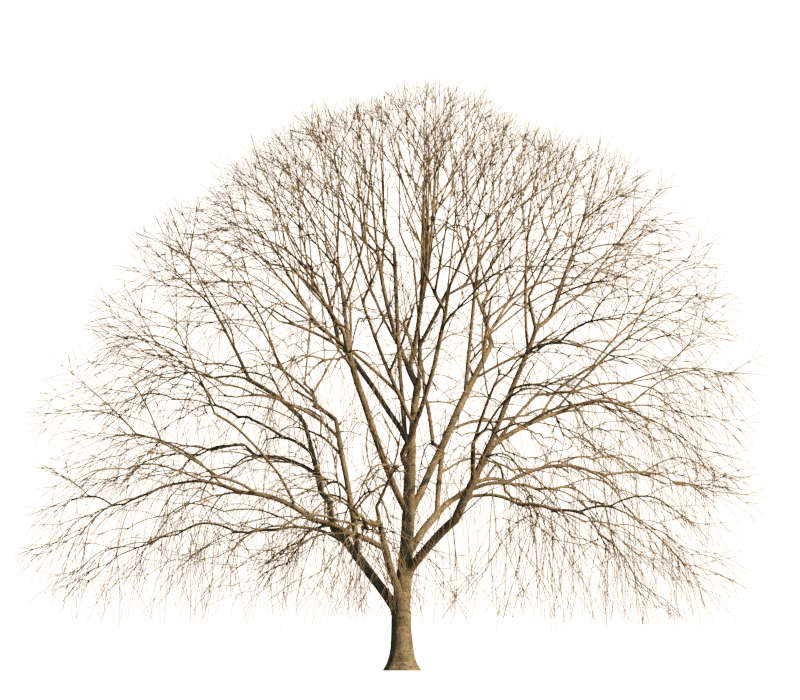
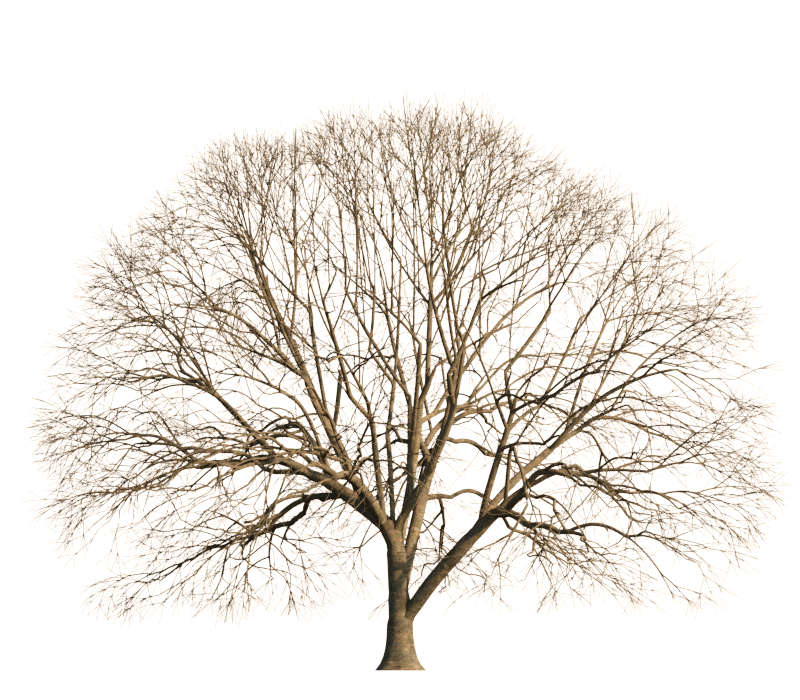
The top tree required 40% light to add new branches, reshaping the shaded areas in its lower crown. The bottom tree was grown without this new feature.
Improved drop low
Before telling you what’s new in Drop Low, it’s best to quickly recap what this tool does. You may be unaware of the logic behind this pruning tool – leaving you confused by the sudden loss of low branches. So let me explain.
Drop Low automatically prunes the base of city trees to allow free passage for pedestrians and traffic. This functional pruning can go several meters high and has defined the shape of trees in our minds – this is how we draw trees.
Note that tree bases are to some extent also clear of branches because there’s just more shade down there – and conifers drop low branches because they favor the healthy ones. But keeping the base clear on deciduous trees requires hard work, or an automatic pruning tool like this.
Automatic pruning gradually kicks in when a tree grows taller – the tree would not stand a chance if we started pruning immediately. Only when the tree grows twice as tall as the set height, we slowly start pruning, as the tree grows, from the ground up to the desired height.
But it is not just human intervention – other causes for dropping low hanging branches include ground frost damage, which is visible on weeping willows. And don’t forget about the city workers of the forest, whose vegetarian residents love the fresh greens and chew them as far as their necks will reach. It is in this last area that the tool has improved.
It now keeps high performing branches that grew thick quickly. Animals prefer the juicy fresh branches and leave the thick ones be. This will allow the tree to grow several big main branches, giving your tree a more natural look. A look that we humans also tend to look for when pruning trees that have more space, like in gardens and parks.
Set Keep Thick to a lower value to keep more (thinner) branches. All in all, this improved automatic pruning tool will save you a lot of time while preserving a natural look.

The tree above was pruned yearly to a height of 2 meters. You can see several successful stems survived.
Improved lateral takeover
Release 3 introduced Lateral Takeover. It allows lateral branches take over, only when a branch tip dies. Now, lateral branches that are more successful than the current branch can take over even if the current branch is still growing, making the rest of the current branch the new side branch.
More fun to grow
The interface is now much clearer. Many parameters have new names to more accurately capture their purpose. Tooltips contain even more information – providing help where it’s needed. Helpful messages in the interface will get you up to speed. Let’s take a look at some of the bigger changes.
Spring cleaning
It’s not just the trees that keep on growing – the interface is too! It now has nearly 90 buttons, sliders, drop downs and check boxes. It’s good to be in control, but many of them are (or should be) hardly used.
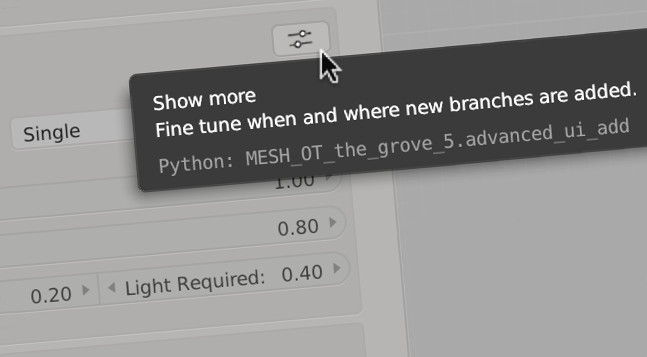
Hiding them almost cuts the interface in half, clearing your mind to focus on the important stuff. You will find a toggle button in each panel’s header to show more controls if you need to.
Drop
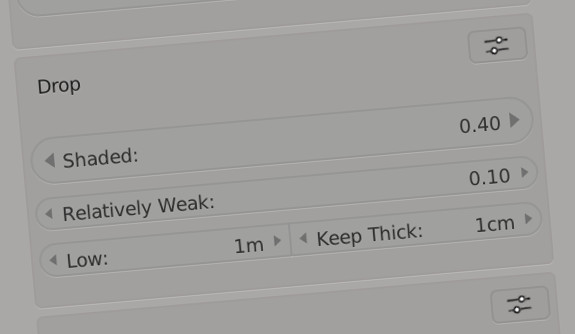
The Prune panel was confusing. It had tools that pruned, dropped and even trimmed branches. The verb prune denotes a human action, but the tree drops most branches by itself. The Prune panel is now know as Drop, and the tools inside now all control how many branches the tree will drop.
You will find tools to drop Shaded, drop Relatively Weak and drop Low branches.
Most of the changes are in naming, with one exception. Drop Shaded inverts the behavior of the old Prune Threshold – it now intuitively controls the amount of dropped branches. 0.0 Keeps all branches, 1.0 drops even the brightest of branches.
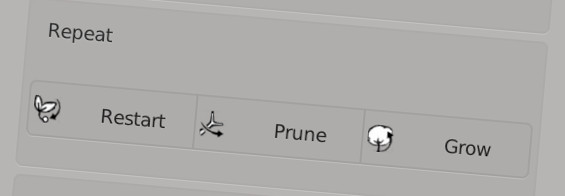
Repeat
The new Repeat panel is conveniently located near the bottom. It repeats the actions Restart, Prune and Grow, without having to scroll all the way up.
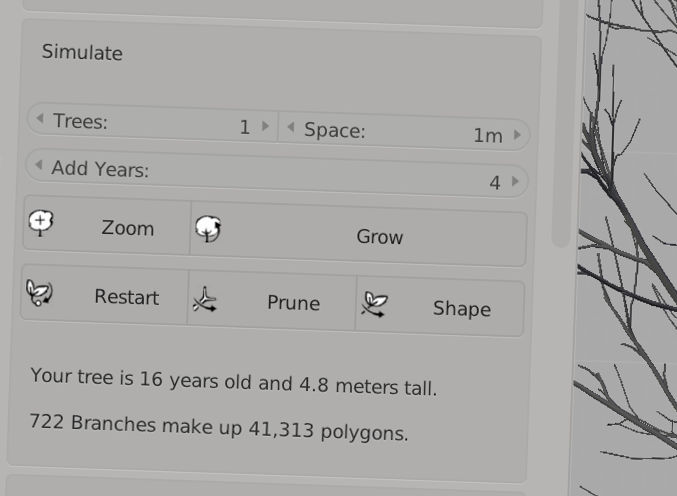
Zoom
There’s a handy new tool in the box. The new zoom tool sets the view to a front view that fits your trees. Located left of the Grow button, it will save you a lot of viewport navigation on your ever growing trees. It is especially handy when you’re new to Blender.
Regenerate
Watershoots and Shade Threshold have new names that better represent their function.
Watershoots allow a damaged or pruned tree to regenerate its crown. When the tree looses part of its crown, older branches within are once again exposed to light. If this light exceeds the amount of Light Required, it will add Regenerative branches.
Grow length
Internode length is gone, enter total length. This makes it easier to tweak.
Shade sensitivity
The shade Sensitivity Gamma parameter was a headache to get your head around. I replaced it with the intuitive Sensitivity. Set to 0 for a slow response to shade – only after a branch receives substantial shade it will react. Set to 1 for an immediate reaction, the slightest bit of shade is magnified out of proportion.
Presets
Many senses and matching reactions guide a branch through space. As more of these effects are added to The Grove, it becomes clear how much influence each has on a tree’s eventual shape. Hundreds of millions of years of evolution filtered out all the “settings” that didn’t work, sparing the species that have just the right distribution of branches to survive their specific environment. The Grove’s presets aim to get as close as possible to the many successful species out there.
New and improved
Several new and updated presets benefit from the new features, improving their character.
Innovation is a good thing, but if you had a masterpiece preset created in release 4 and have a hard time porting it to this release, I recommend to keep the old one installed. Different releases work fine side by side.
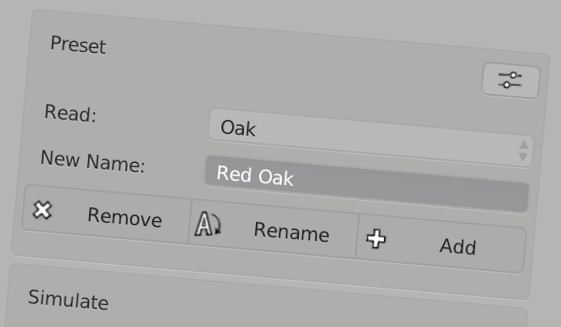
Manage presets
Instead of just adding or replacing presets, you can now also remove and rename presets. Click the Show More button to find this new functionality.
Small features and fixes
- Branch ends had inverted normals causing non-manifold meshes. Fixed!
- Fixed twisting on heavily bent branches. Once in a while a branch on a weeping tree would have a visible twist at some point. This is now fixed!
- Improved interpolation of node directions for smoother mesh building.
- Big speedup when growing multiple trees together, by skipping duplicate shade calculation.
- Blender helps addons keep the scene tidy by performing an undo each time before the addon does its work. Appending or linking new twigs while The Grove is already active causes these twigs to disappear. Leaving the user confused and even raising an error. This release adds thorough checks for disappearing twigs and nicely informs the user about what happened and how to avoid it.
- Adding a preset now correctly selects the newly added preset in the menu.
- In addition to your tree’s length, age and branch count, its polygon count now shows in the interface as well.
- Slightly improved environment blocking. The old behavior was to stop a branch growing if it hit the environment. The new behavior keeps growing along the surface.
- Tree height is shown in feet when your scene uses imperial units.
- The tree object is now named after the preset used to grow it – a handy reference if you want to grow another tree just like it. Particle systems are now also nicely named.
- The best way to learn The Grove is through tool tips – which are now even more informative than before. Hoover over any interface item to show its description.
- And many, many more small improvements that pave the way for awesome features to come.