Plays well with others
Before getting started, it’s important to know that this page is getting a bit old, and The Grove, Blender, and other software are improving and changing. Most importantly, The Grove 11 made a big change to use Geometry nodes for twig duplication, among some other changes in the built mesh. If you have trouble exporting to your 3D software of choice, please try to disable the following checkbox: Edit > Preferences > Addons > 3DView: The Grove 11 > Use Geometry Nodes. Then rebuild your tree and try your export again.
The Grove plays well with other 3D software. The branches are simple polygonal objects that will export well with the OBJ file format. This includes UV maps. Best of all, the Grove’s unique twig system works great in every software we tested. Put to the test so far were Cinema 4D, Modo, LightWave and 3ds Max.
Unfortunately, The Grove doesn’t have access to all software packages all the time, nor do I have the time and experience in the plethora of applications out there. I intend to keep this page update with new insights, and I do appreciate to hear from your experiences exporting to your favorite software.
Most applications work well with the FBX file format, some even import twigs as instanced objects straight away. If you use FBX, be sure to enable “Custom Properties” to include material groups. You will find this option after selecting File > Export > FBX, the options are in the lower left of the screen.
If you want to export wind animation, you will have to use Alembic or if your application supports it, USD. When using Alembic, check the option called “Face Sets” to include material groups.
Whichever application you use, there is currently no export format that supports the transfer of materials. You will get the UV coordinates, but you will have to recreate the materials in your target application, which isn’t too difficult with the provided texture maps and UVs, but it is more work.
You can always export your tree with twigs converted to full geometry, but where’s the fun in that? You will have all the troubles of stock 3D models. Big file sizes, huge memory consumption and low flexibility. Luckily, most if not every 3D software has some way of duplicating objects from face centers, with using the face normal as a heading. Below are short tutorials on how to get trees into several 3D packages in keeping with the benefits of twigs.
What stands out is that every software expects a different initial rotation of the twig. To prepare a twig for export, some straightforward rotations ensure proper alignment. Click on your 3D software to learn more. Listed in alphabetic order:
3ds Max
Cinema 4D
LightWave
Modo
3DS Max
There are two ways to get your tree to 3ds Max. The first of which is simply exporting to FBX. Once open in 3ds Max, this will have created every twig as a linked object instance.
The second option works like The Grove’s twig duplication system in Blender, and it works great in 3ds Max. Like other software, it requires a different orientation for twig objects. Before exporting a twig from Blender, it must be rotated. Select the twig and press N to show the object’s properties. For the rotation, enter X: -90, Y: -90 and Z: 0 degrees. Press Control+A and select Rotation to bake the new rotation into the mesh. Now export the twig as an OBJ file.
Import the separate objects for branches, twig duplicators and the twigs into 3ds Max.
To duplicate the twig along the twig duplicator object, first select it. Head to the Create tab, click the Geometry icon, select Compound Objects from the drop down, and finally click Scatter. Head to the Modify tab to configure the duplicator. First pick the duplicator object and use the twig duplication object for this. Check All Face Centers to get all the twigs needed to fill the tree. 3ds Max has plenty viewport “sauce” and it won’t handle the enormous amount of geometry well. To get a workable view, scroll down to Display Options. Either lower the percentage of twigs shown, or use a proxy object.
That’s it, your tree is now inside 3ds Max.
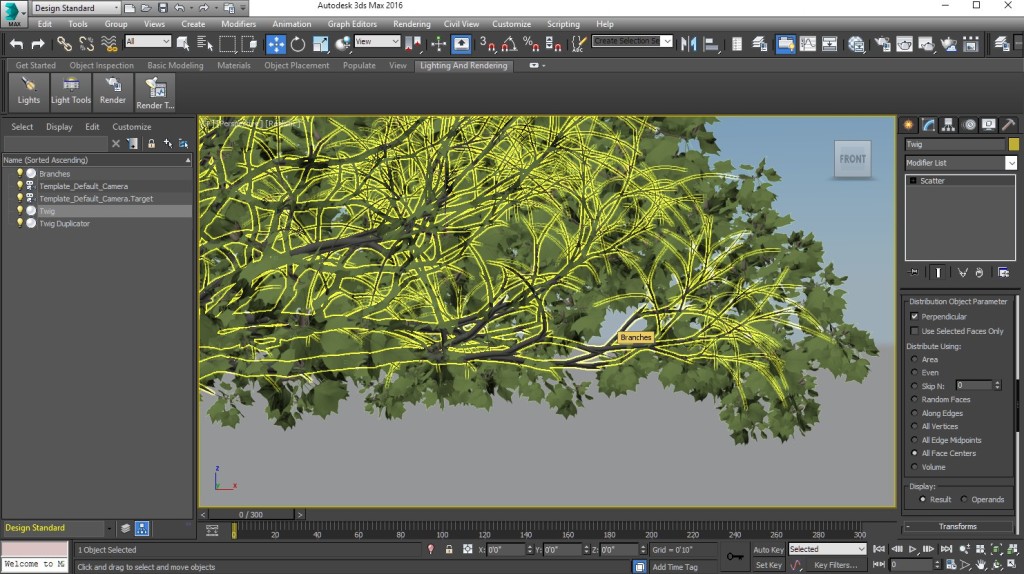
A tree grown with The Grove, exported to 3ds Max. Twigs are duplicated with the Scatter modifier.
Cinema 4D
Importing a Grove tree couldn’t be easier in Cinema 4D. There are two options, the first one assumes that you have MoGraph available, the second one works without.
Cinema 4D – Duplicate with MoGraph
Select the branches, the twig duplicator objects and the twig models you used to grow your tree. Export to OBJ and check the box for Selection Only (in the lower left of the export screen). Import the OBJ file with all settings at default. Your tree’s branches and the twig are now in Cinema4D with UV’s. All that’s left is to redistribute the twigs.
Cinema 4D has a set of tools called MoGraph, that will make this easy. Add a MoGraph Cloner to your scene and drag the twig object into the Cloner. Click on the Cloner object and open the Object tab. Set Mode to Object and pick the twig duplication object. To properly align the twigs, check Align Clone, with an Up Vector of Y+ and set Distribution to Polygon Center.
Create an extra Cloner for your lateral twigs if you use one. Great, your tree is in Cinema4D with all the benefits of the twig system!
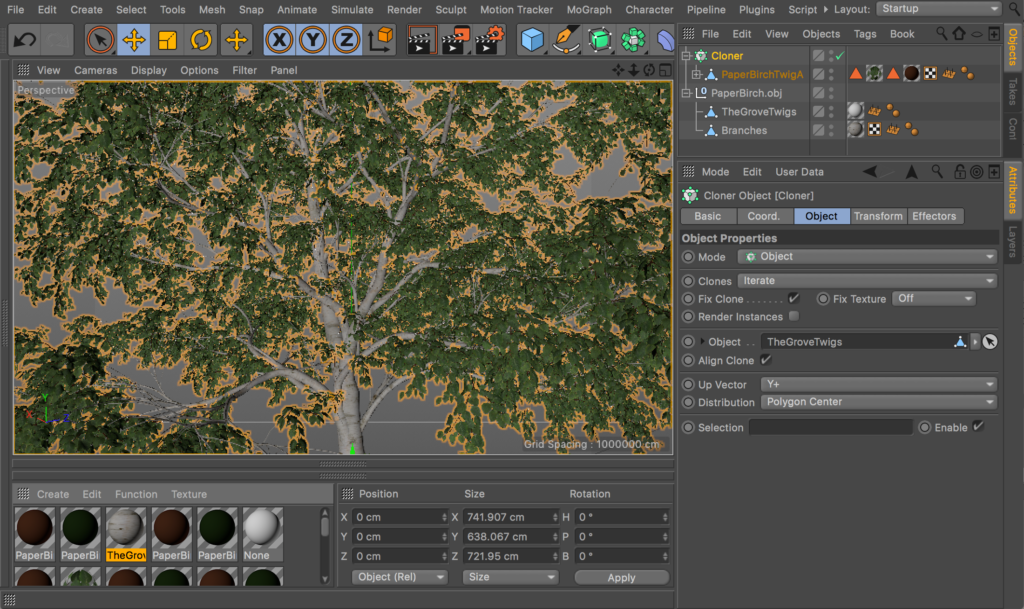
A tree grown with The Grove, exported to Cinema 4D. Twigs are duplicated with a MoGraph Cloner.
Cinema 4D – Duplicate with Object Instances
There is another way, for if you don’t have MoGraph. You can also export your tree to the FBX format. The imported tree will have each twig as a separate object. You can then replace all of these duplicate twigs with object instances following this tutorial at CineVersity.
In short, you create one instanced twig, and replace the rest of the twig duplicates with Null objects. After that, use Character > Commands > Replace With to replace the Null objects with the instanced twig. Be sure to watch the tutorial, it is very clear.
LightWave
The Grove’s trees work beautifully in LightWave and you can take advantage of the convenient twig duplication system.
Export the separate OBJ objects for branches, twig duplicators and the twigs themselves, then import them into Layout.
In release 6 and 7, trees are built as a single mesh instead of 3 separate objects. To get the 3 object back, select your object and search for Separate, then choose By Material. You now have the same 3 objects to work with. I have not had the chance to test with Lightwave recently, so there may very well be a better way to export, and probably you can more easily export the one-object tree and split it up in Lightwave instead. Let me know if you find a better way and I’ll update this page.
The twig duplicator is a mesh object where each tiny polygon represents the placement and rotation of a twig model. Open up the Object Properties for this object. Head for the Instancer tab and add a new Instance Generator. Then double-click it to configure the generator. Click Add Object and select the twig object you imported.
The idea is to place a twig for each and every face. To do this, select Polygons as the duplication type and check Max Polygons. To better see what’s happening, change the draw type of the instances to Shaded Solid. Do this by clicking the small cube symbol beneath the eye symbol in the list on the left. You’ll see that the placement is correct, but the rotation isn’t, so head to the Rotation tab in the lower right. Change the Alignment to Normals and things will have improved, but it’s not quite right just yet. This is because Blender and LightWave’s duplicators require a different orientation of the twig. To fix this, select the twig and press Y to rotate it. In the lower right of the LightWave window, enter a Heading of -90, a Pitch of 180 and a Banking of -90 degrees.
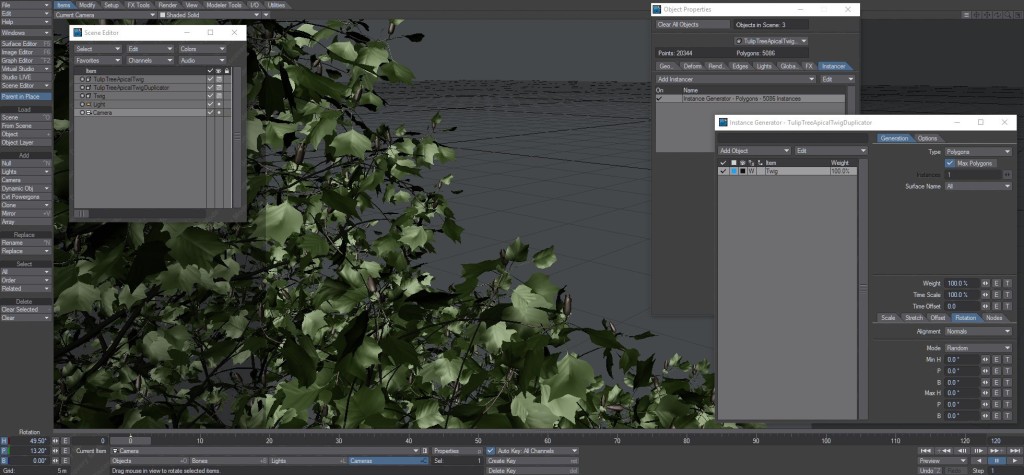
A tree grown with The Grove, exported to LightWave. Twigs are duplciated using an instance generator.
Modo
The Grove user PaQ WaK has put up a tutorial on getting the twig system into Modo. Using Replicators, all the benefits of twigs are kept. Like other software, Modo also requires a specific rotation of the twig model, different from Blender’s.
Read the tutorial halfway through this post on The Foundry’s forum.
Build as a flat mesh
If for some reason you do need to create one single mesh, you can do so with geometry nodes. Here’s how to build a tree with all branches and all foliage as a single model.
- Add a Realize Instances node at the end of the Twigs modifier.
- Then you can either apply the geometry nodes modifier or use Object > Convert > Mesh.
- This is a heavy process that can potentially create a high polygon count, so use it only after you’re done growing.
- Please use a recent Blender release in order to get the latest improvements in their export functionality. In older Blender releases, for this to work, both the bark material and all materials in the twigs need to have their UVMap set. Normally Blender’s material system will implicitly use the UVMap found in the mesh, but that won’t work here. You will have to input the UVMap attribute to each image texture in every bark and twig material.
Other software
Is your software not listed and are you considering purchasing The Grove? If there is a demo of your software available, contact us and we may give it a try.