The Grove 1.0
The Grove 10
Natural simulation is what makes The Grove stand out – it’s built on numerous theories that all work together to make your trees spring to life! I took this peculiar year as an opportunity to delve deeper into the most elusive theories that I’ve been pondering for years. This has sparked new features that will instantly and fundamentally improve how your trees grow. I finally managed to demystify three of the most elusive areas of tree physiology, making it possible to grow more diverse and more extreme tree characters with thicker, natural trunks. This brings us even closer to nature…
I’m excited to bring you along on my journey of discovery, and with these notes I’ll share with you the thoughts and inspiration that went into this mammoth release 10. But before we dive deep into the theory, let’s start with the shiny stuff on the surface.
Draw
I’ll see your drawing and raise you a tree!
This tool is so much fun! Grow a new branch by drawing from any point of the tree. Draw a curvy branch, make a quick sketch to fill a gap, or even draw an entire tree from the ground up.
This is a strange tool for a natural growth simulation and, to make it work, I had to step away from total realism. But just for this tool, of course.
The new branch is grown without the shade of the existing canopy, to give it a fighting chance. The branch also grows at full power along the entire path without slowing down, forking or even the chance of dying along the way.
These tricks make it work nicely, but I still believe that nature is much better at growing trees. Combine your drawing with natural growth, to get a good distribution of branches. The key is to not treat this as a miracle tool (although it would be in the real world).
New growth tries to follow closely, but natural effects like bending and reaction wood can make it diverge a little – as such, one preset may work better than another. Also, be aware that the branches you draw can be dropped when you continue to grow, which can be frustrating. Be especially wary of Auto Prune, which you might want to disable.
Radial tool interface
Time to make The Grove even more fun to use! The draw, bend and prune tools add a new level of interaction that deserves a great user interface – with tangible widgets that work great with a mouse, a pen and even on a touch screen.
Everything about this UI is radial. The slider is a dial that you can twist around in discrete steps – with an outer ring for more precise input. The circular nature is key here, because its compactness solves the most annoying problem for sliders – limited screen space to slide.
There are widgets for actions, sliders, vectors, toggles, progress bars, radial menus and – last but not least – a custom turntable. More on that later…
Radial menus are a neat way of packing more options into a compact UI.
Plant
The viewport UI is a beautiful way to add more options without cluttering the regular interface. It made it possible to create a rich tool for planting trees in a variety of patterns.
Plant a clump of multitrunk trees, a ring, an orchard or hedge, or a patch of tree islands with a natural distribution. It’s quick, interactive and fun to use.
Turntable widget
A walk in the park!
Having grown thousands upon thousands of trees, I also grew tired of having to constantly adjust the view. Time to reduce the tedious actions of zooming, panning and rotating! After countless hours of evolution, I’m bringing together all these separate view actions into one.
Take the new turntable for a spin – it turns, pans and zooms, all with a single move! It sticks to eye level for a true sense of scale, so you always experience the tree as you would in real life.
Simply circle the wheel to turn, and move towards the center to move in. Just a single move of the mouse, the pen or even your finger on a touch screen – and just like the rest of the widgets, there’s no need for a keyboard.
Simulation improvements
Secondary growth
Trees are special plants in that they don’t just grow in length, but also continue to grow thicker. This secondary growth adds a fresh new ring around the existing tree – year after year.
Older wood at the core eventually dies, and although it continues to act as a support structure, it loses its function of supporting the tree with nutrients and water. New rings take over and thicken up the tree.
I love to make sense of things, and in this case I’m far from alone. Wood production is a hot topic of research in the forestry business, both for commercial and environmental benefits.
But even though there’s a lot of research going on, trees don’t give up their secrets easily. Previous estimations on just how much wood builds up over time were based mostly on observations. It’s simply too daunting to measure every branch on an old tree. But that doesn’t stop people from theorizing, and in this case it started over 500 years ago with the curiosity of Leonardo da Vinci. He theorized that the combined cross-sectional area of every one-year old twig in the tree adds up to the total area at the base. More or less.
A slightly more tweakable version of this is what you can achieve with the Join Branches parameter.
Although this theory is a good estimation for younger trees, it starts to fall apart on older specimens. And this was also true for The Grove’s trees, which had a hard time building up really wide trunks when maturing.
I think it is essential for the correct build-up of thickness to take deadwood into account. However, it’s hard to tell how much of a branch’s wood is dead or alive.
I’ve previously implemented several theories, including the Sapwood parameter, and even added the artificial Boost parameter in release 9. These created all kinds of troubling side effects – they are failed theories, and so I removed them.
It was time for a complete rewrite and also a big simplification to start over. The results couldn’t be better!
Deadwood
The familiar Join Branches is still there, but you can now mix in Deadwood. This means that for very little twig or big branch that dies, part of the wood that supported it will also die. This Deadwood is permanent and adds to the usual thickness.
This usual thickness is just the part that is needed to support the tree in nutrients and water. If the trunk is 80% dead, then it needs to compensate with wider rings to continue to support the crown.
This widens the trunk beautifully with age – sometimes even too much. When using Deadwood, you can reduce Join Branches to create a good balance. This will be different for each species.
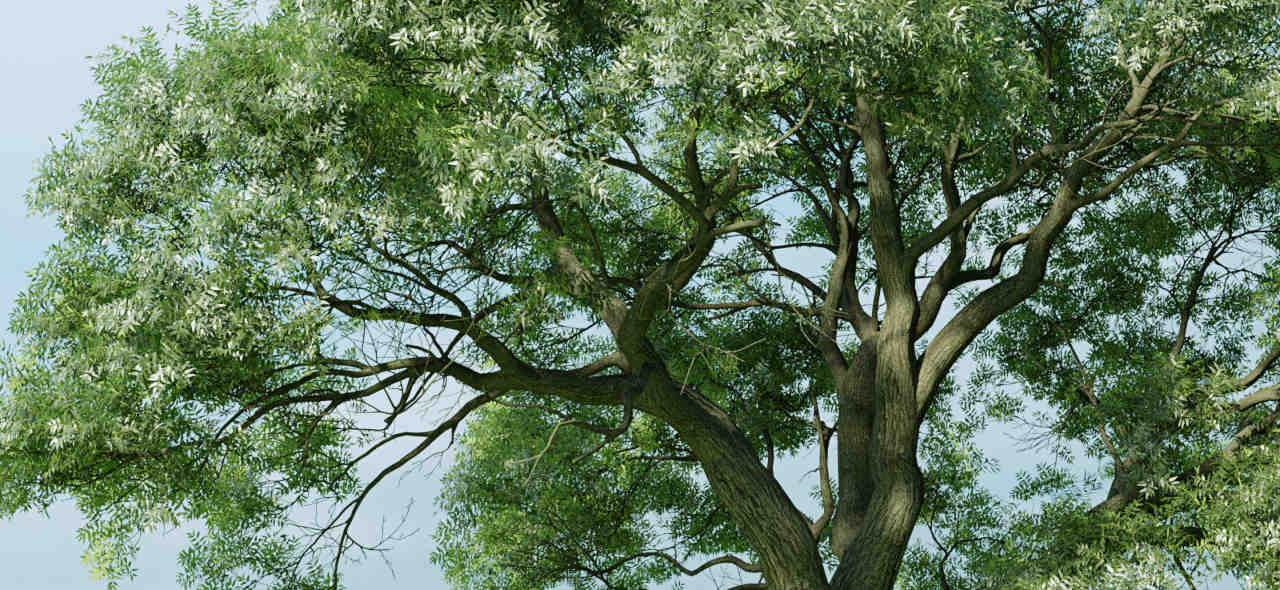
Deadwood in action – a thick, naturally aging trunk on an Ash tree.
Shift in character
It’s a case of balancing Join Branches with Deadwood, and this is where an unexpected side effect reveals itself… when the balance shifts to Deadwood, it has the effect of moving the thickening toward the older branches. The trunk gains more thickness, while the younger branches stay thin for longer.
On the other side of the balance, with more Join Branches, young branches would quickly add up, only to slow down at the trunk.
This has an immense impact on the shape of your trees, simply because thickness is the main thing that both causes and prevents bending. Thickness creates mass, but thickness also creates strength. Thin branches simply bend more.
Find the correct balance to create much better ‘weeping’ trees like birch, willow and spruce.
Excess wood
If you cut a healthy branch in half, at the right time of year, you will not kill it. Its core may become deadwood, but new buds will form around the perimeter. It doesn’t matter how far you cut it – even flush to the ground. The more you cut, the faster it grows back! Also, the thicker the cut, the more excess wood there is to support new growth sprouting from regenerative buds. This excess wood is full of sugar to power new growth.
One thing often leads to another, and in this case deadwood (discussed above) made it possible to properly calculate excess area. That sparked immense improvements in three of the most elusive areas of tree physiology: reaction wood, adding regenerative branches, and the opposite shedding of obsolete branches.
Regenerative branches
The most obvious improvement stemming from excess wood is the natural sprouting of regenerative branches.
Regenerative shoots, or as they are often called watershoots, have been tackled before in The Grove, but it was never exactly clear where and why they formed. What was clear is when they formed – after heavy pruning or natural damage further up the branch. It has been theorized that the opening up of the crown lets in light and that this may give rise to watershoots. Or that a drop in the production of the auxin hormone stops the suppression of latent buds.
I’ve tried many things before, but when I tried using excess wood as the initiator, they appeared at the right spot at the right time!
It’s so simple, and that’s why it just has to be correct. In order to create a branch, you need the energy, and you also need there to be nothing to stop it from forming.
Excess wood means both these things. There is an excess of energy in the wood, and there is more wood than needed to support the crown, meaning that there is a reduction of auxin.
There are still some things I would like to improve, like adding more than one watershoot if a larger cut is made. But this improvement means that watershoots finally appear at natural places. This means a big improvement in pruning broadleaf species.
Abscission
It’s clear now that trees respond like crazy to pruning, creating regenerative branches when there’s excess wood. But when there’s just too much excess wood, the few remaining leaves can’t keep the flow of water going when conditions become dry. This is when the branch will dry out and die.
This doesn’t only happen when you pick up a chainsaw and prune the tree too heavily. It happens all the time in nature, when the crown grows bigger and shades the lower branches. These lower branches will slow down and even lose many of their smaller twigs due to a lack of light, to the point where the branch is thicker than it needs to be – too thick for its dwindling leaves to keep it healthy.
So forget all the previous theories on abscission I (and many other researchers) had – this is how I believe abscission works.
Reaction wood
Gravitropism bends new growth up and away from gravity. The pots of my avocado seedlings were overturned by the wind multiple times this summer, and it’s remarkable to see how quickly the plant can reorient itself, over and over again. This is easy to do for a young and flexible branch.
The Grove previously applied this so-called gravitropism as a first-year-only effect, thinking it would be impossible for a woody branch to reorient itself. But then automatic replanting came along. Introduced in the previous release, automatic replanting made it easier to see the effects of bending, and was one of the inspirations for how reaction wood could work. The other big inspiration was looking at pictures of hillside conifers that were bent in strange ways that seemingly defied gravity, something that I just couldn’t achieve until now.
What it is
In short, it turns out that the effect of gravitropism lasts longer than just the first year – but the long version is worth reading because it’s one of the most effective growing techniques I’ve ever seen…
When you cut through a sideward growing branch, you can clearly see that the rings are oval with more growth at either the top or bottom side. Wood on the thicker side is called “reaction wood”.
Now, I previously thought that reaction wood was simply grown to strengthen the branch and prevent it from bending any further. But it turns out that this is a special type of wood, which is so strong that it can even actively bend the branch back up over the years. Reaction wood makes trees even more dynamic than I previously imagined. It may be slow, but it makes trees dance!
So, how does it work? Well, there are two different types of reaction wood, and even though they are polar opposites, they both have the same effect.
- Broadleaf trees grow reaction wood on the top side of a branch, where there is tension (or stretch) in the wood. Tension wood shrinks when maturing, and this actively pulls the branch upward.
- Conifers, on the other hand, grow more wood on the compressed bottom side of a branch. Compression wood has more lignin and is therefore stronger. The asymmetric growth will expand the underside of the branch to push it up.
Reaction wood is obviously there, but it’s not yet entirely clear what causes it. Although not proven, it most probably forms because of hormones that naturally concentrate in the bottom of branches due to gravity. What has been proven in an experiment is that it isn’t caused by physical stress in the wood. Whatever the cause may be, it’s fun to see that trees haven’t revealed all their tricks just yet.
After being planted at an angle, the successful trunks of these conifers bend up over time, while the weaker side branches don’t create enough reaction wood to do so.
What it does
The effect is upward bending that gets stronger with the increasing success of the branch. So, the quicker the branch adds thickness, the more it bends back up. The most successful leaders will return to the vertical, even if before they were growing sideways. This works beautifully, and you can clearly see new leaders emerge and then vigorously take over.
This is a response by existing branches to a sudden increase in light when the canopy clears up – branches reorient themselves. The way this works is that the increased light allows the branch to grow faster and create more reaction wood. If the branch is successful enough, it will overcome gravity and become a new leader.
New possibilities
- Create bent trees that react to soil erosion on a slope, including the ‘sweeping overshoot’.
- Conifer trees can finally compete with gravity, as heavy branches can bend more without ‘melting’.
- Conifer trees like really old Western Redcedar can finally create upright sub trees, creating the iconic candelabra shape.
- This explains how the weeping apex of Western Redcedar can recover to become an upright trunk over the years.
- I think this is also the key to the elusive candelabra shape of elm and horse chestnut trees.
Conifers in The Grove would previously never recover from their initial angle, while in nature they can straighten out. I had to use extreme gravitropism to achieve this in the past, which would kill the rest of the tree’s character.
Flexible bend
Wood has structure. It’s a mix of live wood and dead wood, with asymmetric growth rings that form under the constant tension of gravity. To make it even more complex, this tension is wrapped and solidified with new rings in the following years. And even dead wood continues to expand and shrink in nonuniform ways…
What I’m trying to say is that it’s definitely not a uniform solid block of material.
In my quest to simulate these effects as closely as possible, the bend algorithm continued to evolve. Along the way, I aimed to capture everything from Italian poplars all the way to weeping willows. But there were two things missing from the equation… reaction wood and dead wood.
As discussed earlier, the new effect of reaction wood means that you can now bend branches much stronger. Reaction wood will take care of reorienting the strongest branches so that you will still have a tree that grows upwards.
Dead wood shifts the thickening of branches towards the base of the tree, while young branches stay thinner for longer.
With reaction wood and dead wood now in place, I could suddenly grow the same diversity of tree shapes with a much simpler bend equation. I could remove the extra complexity that I thought I needed before. Even better, I can now grow even more extreme weeping trees.
A Weeping Willow tree, with thin end branches, and a supporting trunk that widens with deadwood.
More extremes
Parameters like Favor Ends and Favor Bright are ways to direct growth to the best places. To suppress growth of new side branches and to grow to bright places instead of shade. When adding a new branch, its power is limited by these parameters, and a weaker branch will grow shorter.
But I discovered a mistake in the code, which caused a disconnect from adding a new branch and actually growing it. This caused the first new node to be unaffected and to always grow the full internode length – so at full power!
This meant that the effect of Favor parameters was weakened. It would fade the contrast in power between bright and shaded branches caused by Favor Bright, and it would create side branches that were too long when using a high Favor Ends value.
Now that this is fixed, the Favor parameters can grow more extreme tree characters than ever before.
Wind animation
Viewport tool
Wind animation is now an interactive tool that uses the new viewport interface. Wind parameters now only show when they are needed, cleaning up the regular interface.
Use the new vector widget to freely set both the wind direction and the wind force at the same time.
Quality boost
Several improvements now give wind animation a quality boost with stronger winds.
Improved shade casters
The leaves of a tree spread out to gather as much sunlight as possible. But in doing so, they also cast shade on leaves below. The competition for light is an important aspect of tree growth, and isn’t just a fight between two trees – it’s equally a fight between branches on the very same tree.
Depth
The Grove uses raytracing to calculate the light at every branch end. Leaf areas were represented by simplified planes instead of high poly twigs. Horizontal planes prevented self-shadowing and were fast to calculate.
This worked well for light coming from above, but there was a downside to this simplification. Other planes would be invisible to light rays coming from the sides, and therefore the tree’s foliage would cast less shade than it really should.
This was obvious in the presets, most of which needed a Drop Shaded value of around 0.5 to drop enough branches. This means that just 50% shade would cause a young shoot to die, while real trees tolerate much more shade. Another way to tell that this wasn’t right was to use a react object to shade the tree. This geometry would cast a realistic amount of shade, but would prune the tree way too heavily at 50% shade tolerance.
The solution presented in this release is to introduce depth in the leaf areas. By finally finding a solution to the self-shadowing problem, I can now use any shape. I’ve experimented with different shapes and shifting them along the branches, but I finally settled on just two triangles, to also keep the advantage of fast calculation.
Depending on the depth you set, the shade rapidly increases and Drop Shaded values of around 20% can be used, which is in line with the actual light that a twig needs to survive.
This improvement also strongly intensifies phototropism. It not only creates more shade where there is foliage, but it also adds more contrast between shaded and light areas. This is what phototropism needs, and you can clearly see the effect of phototropism being much stronger because of it.
From sides
Shade casters can now also be placed along the sides of branches. Before now they were only added to the ends, a simplification that saves time calculating and works great for most types of trees. Except on trees with a weeping habit. These can benefit from more accurate foliage, which you can now get by checking Sides.
Reduce
The Reduce slider will scale down the shade areas on weaker branches, because their reduced foliage should cast less shade.
Try it
These three improvements can be tested interactively by enabling the shade preview, just click the little eye icon in the Shade panel and play with the sliders to see what they do.
Grow together
The definition of the word grove is a group of trees of the same species. There are numerous places in English speaking countries that are called Oak Grove, Pine Grove, Elm Grove and so on. The Grove stays true to its name, as you can grow a number of trees together as a group, as long as they’re all the same species.
Time to mix things up and allow the growth of mixed groves. Some of you may have already discovered a hidden feature in previous releases of The Grove, where you could attach a preset name to an empty object, telling The Grove to switch presets for each tree. But this was hidden for good reason – there was no way to use different twigs, and it didn’t work with different simulation scales.
Now I’ve come up with a much better solution, which is in keeping with The Grove’s name. Each grove is still a single species (with as many trees as you like), but now you can grow all the separate grove collections in your scene together as one. Each grove can use its own preset and its own set of twigs.
The main thing is that it considers the shade from all the groves together. It’s all about the competition for light, and now you can set up battles to see which one wins!
Limitations
For now, it’s not possible to record growth animations while growing together. And you’ll also have to select the correct grove collection to prune and bend its trees. It’s also slow to grow, but it’s a good start for further improvement.
Small features and changes
- Record growth offset parameter, to start / shift the animation to another frame in time.
- Young data layer, acting like a mask for the last 3 years of growth, so you can manually attach needles along the sides with a particle system, for conifers.
- The Prune tool previously had a Shape mode, that allowed the cut ends to be reset as if the branch was never longer in the first place. This was an artistic, but fake option. It was nice, but with the improvements made in the thickening code, this mode can not function anymore, so it had to go.
- The Grove is now more careful when creating materials. It tries to create all the necessary nodes, but it won’t give an error when it fails. There are a lot of exceptions that can happen, with users installing different render engines or color profiles. Problems when using the ACES color configuration are fixed.
- Removed the Longer in Shade parameter from the Grow panel. I think this behavior only happens for the first year in plants and trees that start growing from the energy reserve of their seeds. As such, I don’t think this is a relevant parameter for the formation of trees.
Fixes
- A single fix for two bugs in wind animation. The branches on older trees could slowly inflate over the duration of the animation, and this increased thickness would also change bending and thus create a glitch in the otherwise seamless loop. The cause was an overachieving smoothing that was applied when building the tree mesh. The repeated builds that happen when simulating wind would also apply this smoothing multiple times. This bug was recently fixed and a fix for release 9 is also available.
- Bend number of nodes independence.
- A rewrite of how branches gain thickness fixed the bug where trunks could sometimes explode in width.
- More bending in presets.
- Random heading was almost invisible on non-horizontal branches – it is now much stronger.
- Fix for zoom operator not zooming in completely the first time.
- Clear the selection of old objects before adding a built tree object to the scene.
- Make the newly built tree object the active object. It is not selected to avoid outline drawing, but it should be activated so that the properties view displays its properties.